Since moving into our current house, Casey and I have been trying to make our living room audio setup seamless. This is a silly story with a lot of unnecessary detail about my adventures and choices in home audio setup.
The wish list
Music is our primary focus. We have no need to switch video. RCA and 3.5mm cables are the norm, not HDMI. This doesn’t prevent us from getting a receiver that supports RCA, but those tend to be bulky and have lots of buttons.
We share a large MP3 library that we would both like to control. It’s easy enough to take turns plugging our computers or phones into an aux cable, but it’s so much more seamless to collaboratively queue things up in the same player. There’s a mix of Windows and OS X machines in the house, so the solution has to be multi-platform.
We have a PC that functions as a TV and gaming machine. Latency is important for that use case, so wifi is out.
Speaking of gaming, it would be nice to be able to hear two audio sources at a time. I often disable game soundtracks and play my own tunes.
When people come stay with us, I want to be able to explain how it all works in less than 120 characters.
And finally, I shouldn’t need to mess with it constantly. It should do everything we need without crashing or fiddling.
I’ve tried a bunch of low-cost configurations, and this is what we have today. It’s reliable, predictable, and hits all the points above.
Mac as media server
I have an old Mac laptop from 2011. Here’s how I set it up to act as a media server and audio passthrough device. Note that I already have an amplifier for the speakers. If you don’t, well, maybe you’re better off with a regular receiver! Anyway, on to setup.
Find an out-of-the-way location. Plug the laptop into the speakers and power. We’re about to set things up so you don’t need to be physically at the computer to manage it, so don’t worry about the location being convenient to access.
Initial setup (seated at media server)
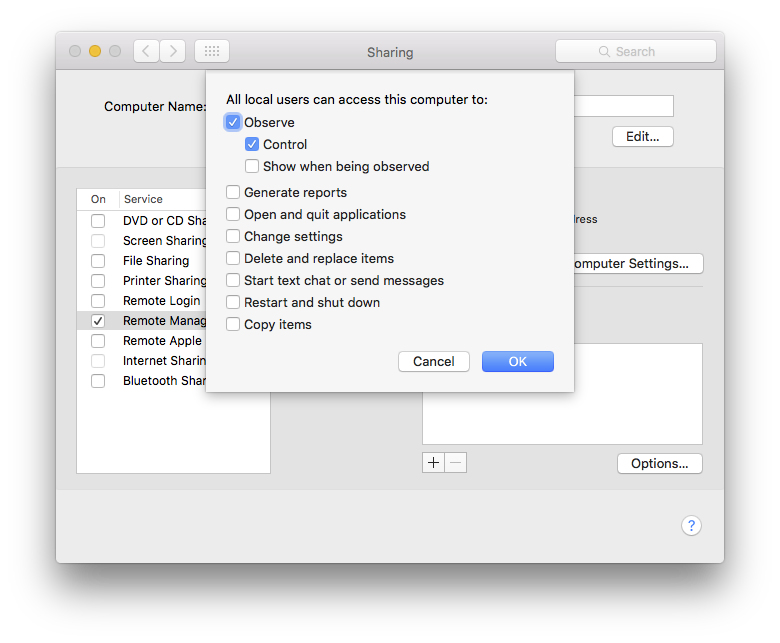
Open System Preferences. Select Sharing. Check the “Remote Management” box, and when the drop-down opens, select “Observe” and “Control.”
Set or remember the “Computer Name” field at the top. A nice, short name you could use would be media-server. Going forward, I’m going to assume you used that name.
Still in System Preferences, click the back button. Go to “Users & Groups”. Click “Login Options.” Make sure the “Automatic login:” menu is set to the user you want. (You may also need to go to “Security & Privacy” in System Preferences and uncheck “Disable automatic login.”)
Install InsomniaX if you’re using a laptop. This will let you close the lid without putting the laptop to sleep. Once installed and running, open the menu, and make sure Preferences > “Start on Login” is checked.
Now close the lid and head to another Mac so you can configure things more comfortably!
Remaining setup (remote)
On Mac number two, open a Finder window. In the Finder menu bar, select Go > Network or hit Command+Shift+K. Pick media-server from the list and click the Share Screen button. Enter your username and password for your account on the media server.
You should see a list with media-server init. Click it. There should be a “Share Screen…” button. Click it. Enter your username and password from media-server.
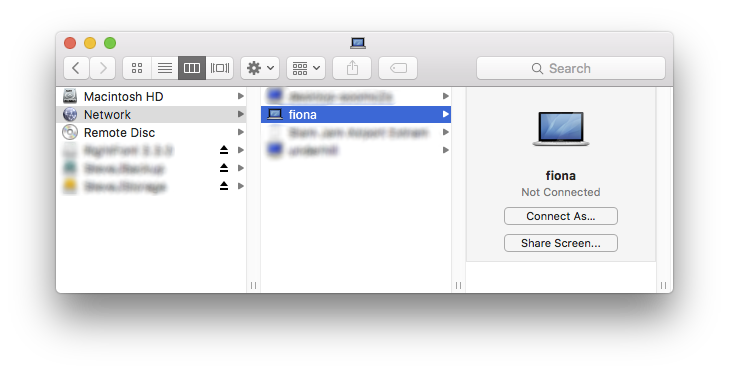  (I call mine “fiona.”)
 (I call mine “fiona.”)
Before you really get going, you might want to take some time to open your wifi router’s settings and assign a dedicated internal IP to the media server. Macs will be able to connect to it as media-server.local, but Windows machines won’t. I won’t provide specific instructions here due to the infinite variety of router software, but it was pretty simple on my Airport Extreme.
From here there are a ton of things you can do, so I’ll organize the rest of this post by topic.
Spotify
Spotify is easy to set up but limited to one user. Install Spotify on the media server, sign in to it, and ask it to launch itself on login. (Menu -> Spotify -> Preferences, Show Advanced Settings, Open Spotify automatically after you log in to the computer.)
Your devices can now control Spotify on the media server, but you have to be logged in as you. Even with family sharing, there’s no way to share a device among multiple user accounts without going for a super-technical solution like mopidy-mopify.
In our case, this means one of us has to use aux or Bluetooth to play Spotify through the speakers.
MP3s
All of my solutions to the MP3 library problem are, unfortunately, pretty technical. I don’t have any recommendations for people who are not comfortable with the terminal.
The best-documented ways to share an MP3 library are mpd and mopidy. Both solutions mostly work but are broken in some annoying way and don’t have any truly great clients.
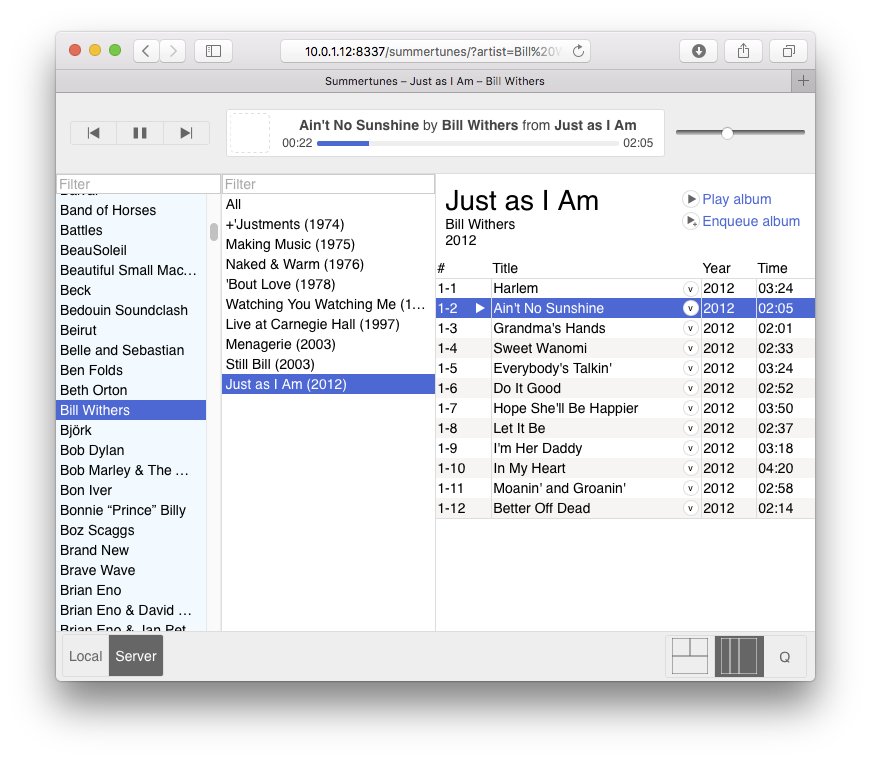
I prefer to use my own project, Summertunes. It glues together the beets extensible music library manager and mpv player in an iTunes-like web interface. That means Casey and I can control the same library and playlist from any web browser on any device, including our phones. It’s responsive and reliable.
I use LaunchControl with some shell scripts to run mpd and Summertunes on login, so I never need to mess with them manually unless they break.
I recommend Cantata as an MPD client. It’s not very Mac-like, but it’s easy enough to find your way around.

We only use MPD if I’m actively working on Summertunes and have temporarily hosed the installation. So about once per month.
Input passthrough
The Mac takes care of a lot by itself, but we still need to support a home theater PC, Bluetooth adapter, and 3.5mm aux cable. Some external hardware is necessary.
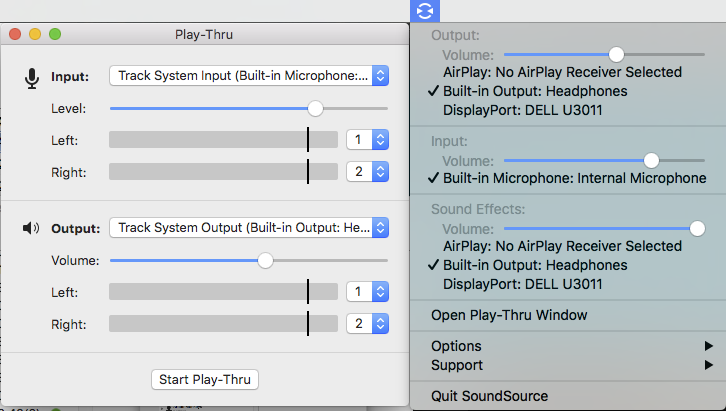
We could have the Mac output to a switch, but I’d rather just have everything merged into one signal so the music players work 100% of the time without having to remember what channel something is on. We can accomplish this using SoundSource, a $10 utility that lets you mirror your Mac’s audio input to its output.
Buy SoundSource, run it, select “Open Play-Thru Window” in the menu, and click “Start Play-Thru.” You’ll need to hit this button after every reboot, unfortunately. If you use SoundSource for this purpose, please join me in sending feature request via their support form asking them to let us auto-enable it.
Audio switching
At this point, we’ve got a Mac hosting a music library and Spotify, which will pass through any input we send to it through its line-in port. We need to add Bluetooth, 3.5mm aux, and a home theater PC.
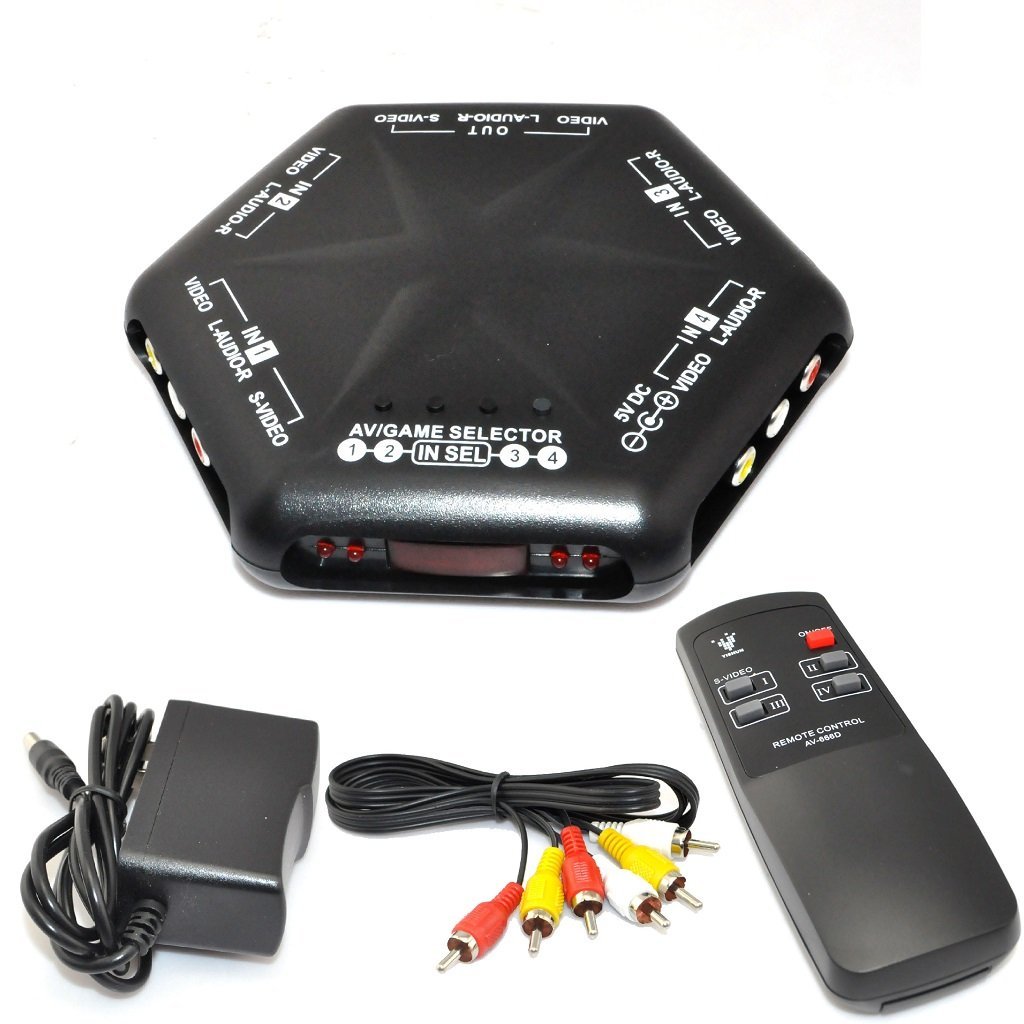
I spent hours on Amazon trying to find a device that does nothing but switch between 3 RCA or 3.5mm inputs, and has a remote control. The reason this is hard to find is that most people use a stereo receiver, which is both an amplifier and a switch. (Example, $150.) Stereo receiver remote controls never have fewer than 30 buttons. I don’t want anything in my house that has a D-pad and isn’t gaming controller.
I found exactly one device that fits my requirements: “iKKEGOL 5 Ways 4 Port IN 1 Out Video Audio S-Video Game AV Switch Box Selector with Remote Control Av-666d Black”. It was twenty bucks and its remote has five buttons: four for input selection, one for power.
Bluetooth
All Bluetooth devices for home use are garbage, but some are less garbage than others. I have had okay but not great luck with this adapter from Esinkin and was totally dissatisfied by this one from iKross. I didn’t realize it at the time, but The Wirecutter has some suggestions that might be better.
We use Bluetooth a lot less now that Summertunes is working and populated, so I care about this a lot less than I used to.
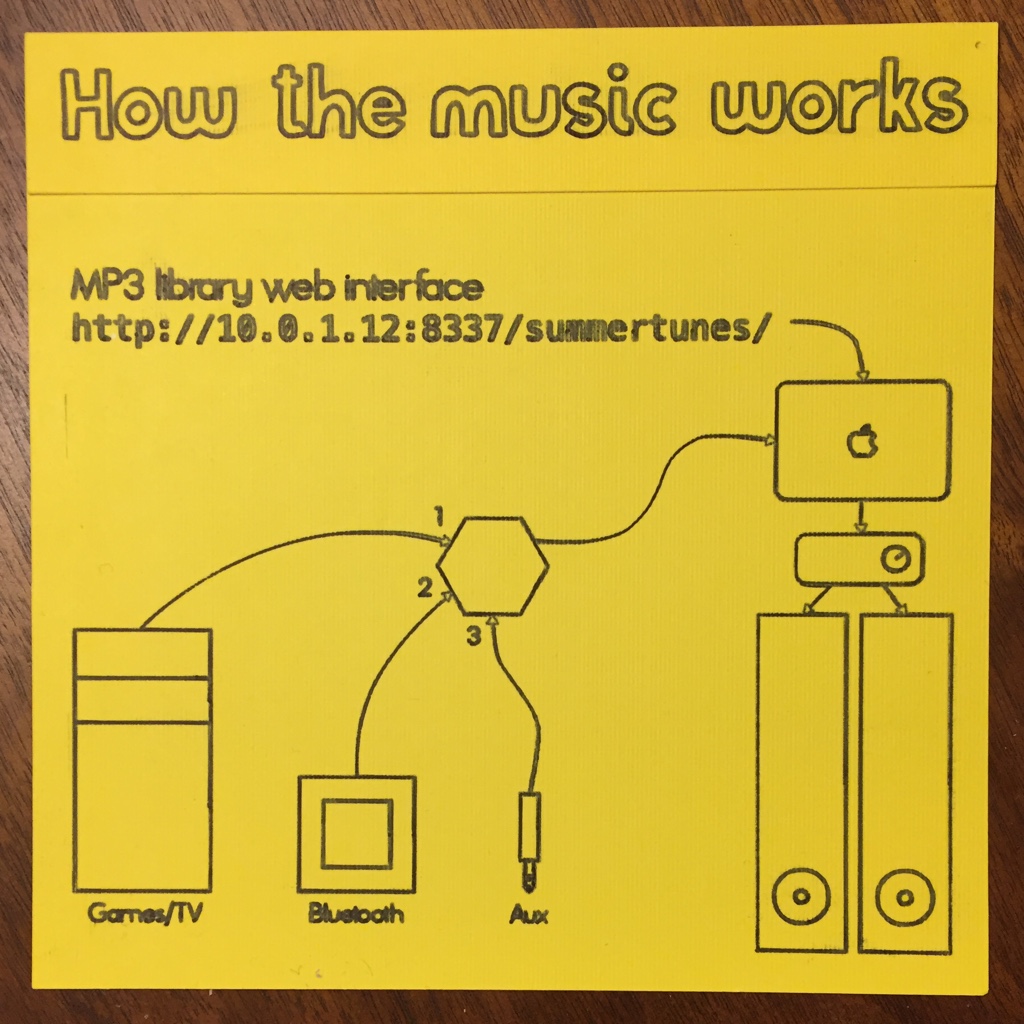
Pieces of flair
Every home across America with more than one audio source has a unique and probably awful system for getting audio from point A to point B. Ours is particularly unique! So I designed this handy reference card, and Casey printed it out on our brand new Cricut:
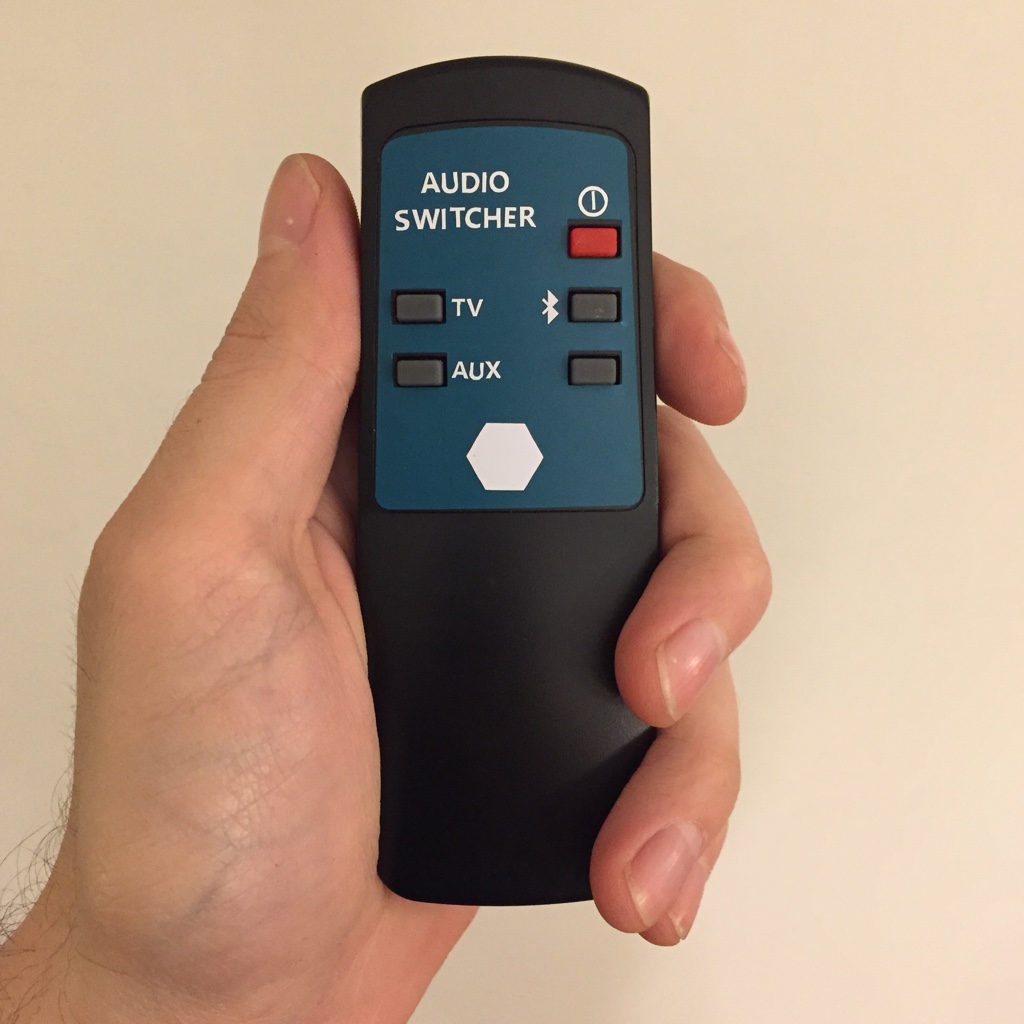
Casey also gave the switcher remote the Cricut-assisted personal touch:
We’re still left with a minor cable nest, but the volume of the whole setup is only about two Macbook Pros.
Parting thoughts
After writing all this out, the first question I had for myself was whether it was all worth it. Shouldn’t I have just bought a stereo receiver?
I’m still glad I didn’t, if only because of those damn remote controls. And the mixing of two sources is really nice.
The only downside is that the switch I ended up with is not very well built and introduces a tiny bit of hum. The remote has to be pointed straight at it for it to work, too. But on the other hand, it’s simpler than any other home audio system I’ve used.